"If you're not going to be ready to fail, you're not going to learn how to cook." -Julia Child

Monday, February 21, 2011

Black Bottoms

This is a black bottom cupcake. It's basically just a plain chocolate cupcake with a dollop of cheesecake in the middle. This is a classic recipe and should not be messed with. I don't know what else to say, but you should make these. They are so easy and so good.


Black Bottom Cupcakes
from allrecipes.com


1 1/2 cups flour
1 cup sugar
1/4 cup cocoa powder

1 tsp baking soda
1/2 tsp salt
1/3 cup oil
1 cup water
1 tsp vanilla
1 tbsp white vinegar


8 oz cream cheese
1 egg
1/4 tsp salt
1/2 cup sugar
1 cup mini chocolate chips

Preheat oven to 350 degrees. Mix flour, sugar, cocoa, baking soda, and salt in a large bowl. Make a well in the center, and add the oil, water, vanilla and white vinegar. Whisk together and set aside.


In a separate bowl, beat the cream cheese, egg, salt and sugar together. Stir the chocolate chips into the cream cheese mixture. 


Line a muffin pan with paper liners. Fill with chocolate batter until 3/4 full. Top with 1 tablespoon of the cream cheese mixture. Bake for 25 to 30 minutes until set.

Thursday, February 17, 2011

Chocolate Rice Krispie Treats

Everyone's made Rise Krispie treats at one point or another. The recipe is a pretty basic and well-known one. It's delicious the way it is, but I decided to put my own twist on it and add some chocolate chips. They turned out great! You can really add anything to this recipe. Next time I might try adding peanut butter or Nutella. You really can't go wrong with this recipe.


Chocolate Rice Krispie Treats


5 cups Rice Krispies
3 tbsp butter
8 oz. mini marshmallows
1/3 cup chocolate chips

Melt the butter in a large pan. Add the marshmallows, and continue stirring until melted and fully incorporated. Turn off the heat and stir in the chocolate chips until the mixture is smooth and lump free.

Place the Rice Krispies in a large bowl, and dump the marshmallow mixture on top. Stir until completely combined and evenly distributed.

Butter a medium sized pan (around 8x10) and dump the mixture in. Pack down firmly. Allow to cool for 30 minutes. At this point, you should be able to invert the entire thing and have it pop right out for easy cutting.

Monday, February 14, 2011

Strawberry Rhubarb Fruit Leather


Remember those fruit roll-ups you used to eat as a kid? I would take them to school with me all the time for lunch. They bring back so many childhood memories, so I decided to try to make my own and reinvent them with some new flavors. 

I really love the combination of strawberries and rhubarb, which is a pink vegetable that resembles celery. It's pretty tart, which is why it needs to be cooked with some sugar.

Fruit leather needs to be dehydrated in an oven with very little heat for a very long time.


Once fully dehydrated, it should still be pliable, but completely firm to the touch.


Strawberry Rhubarb Fruit Leather
Note: I'm keeping this recipe pretty basic. You can really make this with any combination of fruits and spices, but you will need to adjust the sugar based on what variety you're making and how sweet the fruit is.

1-2 lbs. strawberries
A few stalks of rhubarb
Squeeze of lemon juice
Sugar (I used about 1/4 cup, maybe a little more)
Water

Cut the rhubarb into one inch pieces, and place in a saucepan with the lemon juice and just enough water to cover them halfway. Simmer on medium-low for about 5 minutes. In the meantime, cut the strawberries into quarters. Add them to the pan, and continue to cook for an additional 5 minutes or until tender.

Once cooked, place the mixture into a blender and pulse until combined and smooth. At this point, start adding sugar until it's sweet enough for your liking.

Line a couple baking sheets with non-stick plastic wrap and divide the fruit mixture up between them, evening them out with an offset spatula. Bake on a very low temperature (between 140 and 180 degrees) for about 6-8 hours, or until completely dry to the touch.

Nutella Cookies

It's currently 3:21 AM on a Sunday night. I just finished a paper for one of my classes, which is due today of course. I'm exhausted, so I'm going to keep this short and sweet. 

I love Nutella. Who doesn't? It's good by itself, but it's even better in cookies. Try it. You won't be sorry.


These cookies are crispy, salty, and sweet all at the same time. They're crunchy, yet still have a very slight chew to them towards the center. 


Nutella Cookies
Yield: 2-3 dozen cookies

1 ¾ cups all-purpose flour
1 tsp salt
1 tsp baking soda
1 egg
1 egg yolk
1 cup butter
1 cup brown sugar
½ cup sugar
1 tsp instant coffee powder
1 tsp vanilla
½ cup Nutella
¼ cup mini chocolate chips

Preheat oven to 375 degrees. 

Cream butter and sugar in a bowl until fluffy. Add eggs, vanilla, and nutella, and combine. 

In another bowl, sift flour, baking soda, coffee powder, and salt. Slowly add dry ingredients into wet, constantly mixing until fully combined. Fold in chocolate chips. 

Using a 1 tbsp scoop, place on cookie sheets lined with parchment paper. Bake for 14-16 minutes. Allow to cool completely on a wire rack.


Happy baking and goodnight.

Tuesday, February 8, 2011

Oreo Truffles


Anyone that knows me knows that I am not a big fan of Oreo cookies, so why did I make a dessert that revolves around them? Well, it was one of my best friend's birthdays yesterday, and when I asked her what she wanted, she said the only thing she wanted was for me to cook for her. How could I say no?

Being as I don't like Oreos, I was hesitant to try this recipe, but I've seen it on a few blogs and I couldn't find one person that had something bad to say about it, so I figured I'd give it a shot. It was definitely worth it. These truffles are amazing. They're incredibly rich, so you really only need one or two for a satisfying dessert. I have to admit, they turned me into an Oreo fan.

Happy Birthday Judy!!!

Note: This recipe is a great starter for all types of truffles. I'm sure you could substitute peanut butter cups or any other kind of cookie for the Oreos and get similar results.


Oreo Truffles
Recipe from Kraft Recipes

1 16 oz. package Oreos
8 oz. package cream cheese, room temperature
12 oz. bag of semi-sweet chocolate chips (I used Ghiradelli)

Place cookies in a food processor and pulse until fine.

Cube the room temperature cream cheese and add to the food processor. Pulse a few more times, until the mixture begins to form a ball and looks to be evenly combined.

Roll mixture into one inch balls and place onto a cookie sheet lined with parchment paper. At this point, it's best to place the truffles in the freezer for ten minutes so they can quickly set and refrain from falling apart when dipped in the melted chocolate.

In the meantime, melt the chocolate over a double broiler. Once ready, dip the truffles in and completely coat in chocolate, allowing the excess to drip off.

Place in the refrigerator for 30 minutes to set completely and allow the chocolate to harden. Serve and enjoy!

Tuesday, February 1, 2011

Banana Bread


Every Tuesday I get together with two of my friends for dinner at one of their apartments. This week we decided that each of us would make something. I quickly claimed dessert, being that it is undeniably the best part of any meal.


I wanted to make something that's quick and easy because of the small kitchen and limited cooking supplies that we have to work with. Banana bread instantly popped into my head. It uses ingredients that everyone should have in their kitchen. This banana bread is easy to make and even easier to eat. It's a nice and decadent treat to snack on anytime of the day. These mini loaves are perfect for sharing with friends, or not- your choice. I recommend cutting them into pieces and freezing them. Then, whenever you need a fast breakfast or dessert all you have to do is pop a couple pieces in the microwave! Easy as that. 


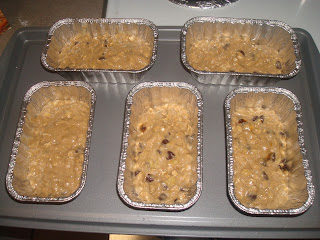
Before

After

As you can tell by these pictures, the banana bread doesn't rise significantly, but it does slightly darken in color after being baked.


Mini Banana Bread Loaves
Adapted from: Sweet Treats and More


1 1/4 cup all-purpose flour
3/4 cup packed brown sugar
1 cup rolled oats

1/2 tsp salt
1/2 tsp baking soda

1/4 tsp baking powder
1/2 tsp cinnamon

1 tsp vanilla extract 
3 tsp vegetable oil
1 egg
2 egg whites

3 large bananas, very ripe
3/4 cup chocolate chips


Preheat oven to 350 degrees. In a bowl combine flour, oats, salt, baking soda, baking powder, and cinnamon.


In a large bowl mash bananas well. Add in eggs, sugar, vanilla, and oil and whisk until combined. Slowly add in the flour mixture and combine, making sure not to over mix. Fold in chocolate chips.


Grease mini loaf pans with non-stick cooking spray, and distribute the batter evenly into however many pans you have. Just make sure not to fill more than 3/4 of the way, as they rise slightly while baking.


Bake for 30-40 minutes, or until the loaves are firm to the touch and a toothpick comes out dry.


If you choose to make this into one large loaf, bake for 45-50 minutes.